And Now?

And Now?

And Now?

All I wanted to do is to stretch some glass to make glass shards. Yes those very little thin sharp glass pieces. This is at least my 5th trial and each time the kiln and the glass have a mind of their own.

And Now … I have another good for nothing but fascinating piece that I don’t want to smash into charts.

Happy Fusing!

Coral with Frit and Vitrigraph Stringers

Coral with Frit and Vitrigraph Stringers

All you need is some Wissmach Glass Frit and a few vitrigraph stringers in a variety of thicknesses.

How To Steps

  1. Place a piece of Papyros Paper on a kiln shelf. I used a small 6″ x 6″ Kaiser Lee Board shelf. 
  2. Now you can lay out a fan like design with your stringers
  3. Fill in the gaps with clear glass frit. I used Wissmach 96-01 in medium and fine about 2 layers thick
  4. Fire your Coral with this one segment firing schedule.
  5. Fire up as fast as possible (Full)  to 1400°F (760°C) and hold for :10. Observe for desired result. Let it cool to room temperature on its own. 

A Creative Time at the Fuse It Studio

A Creative Time at the Fuse It Studio

Last week Lindsey and Chase booked a private session to create their “Love Lamp” with my help and a few minor design suggestions. Both never had made anything in kiln formed glass before, but like to share their creativity with each other.

They definitely wanted to keep the luminescent shine on the Wissmach dark blue glass and the black clear Wissmach Prisma glass. In the first firing I took the kiln up to 1410° F with a 12 minute hold time. The Papyros Paper™ protected the luminescetn coating nicely without leaving a trace behind.

My next concern was the drape firing. I placed the pre-fused rectangle without the Papyros Paper™ cover on a 6″ high stack of Kaiser Lee Board to bend one side down in a 90° angle.

This time I fired the kiln to 1180°F and hold  10 minutes using the smape pieces of Papyros Paper™ a second time to cover the luminescent glass with great success as you can see in the image below.

Website Security

Website Security

Some of you might have gotten a warning from Google when you tried to open www.kaiserlee.com. Even so our site was always secure, and our ordering system is encrypted, Google forces you to buy an SSL Certificate and change the address from http to https in order to provide a site without warning. Since we do not want to scare anybody away I spend half a day to install the Certificate on our site. Here is the new and official link to the old/new site.

https://kaiserlee.com/

Any old link will still work, but it will take a little bit longer, before it will be re-directed to the new https site.

Create Shapes with Powder Wafer Glue Film and Kaiser Lee Board

Create Shapes with Powder Wafer Glue Film and Kaiser Lee Board

When I first saw the Powder Wafers™ glue film from NO DAYS I liked the idea of being able to create any shape in glass that you could cut out of the glue film. You can use scissors and even paper punches. What kept me from trying it was the recommended  firing schedule and having to keep the kiln vented for all those hours. 

A) 150°F dph to 300°F – hold :45       B) 250°F dph to 600°F – hold :45    C) 250°F dph to 1000°F – hold :45    D)Continue to fire as normal 

Yes you can program a kiln and not worry about it. But somehow I shy away from long firing schedules even more so now, since I heard about those relay problems people have encountered. Knock on wood, so far I have not had a relay break on me in 17 years. 

Here is the mold I used for my trial. It is a small piece of Kaiser-Lee Board with an indent. I place it in the big kiln with everything else and took the risk of not even venting my kiln. In the future I will use my firing schedule (see below) and fire the pieces in a different kiln which I can vent easily until it reaches a 1000°F.  This is the firing schedule I use for small pieces like this one. 

A) ramp up 900°F to 1000°F hold :10

B) ramp up FULL to 1410°F hold 10

C) ramp down Full to 900°F hold 15 

D) ramp down 100°F to 700°F hold 0 – let cool to room temperature!


Sorry I did not take any pictures before the firing, but here are the steps.  First I placed a piece of Papyrus shelf Paper™ in the size of the glass on the mold. Then I placed the 2 Powder Wafers™ butterflies on the paper with a piece of clear glass on top.  In the picture you see the the small dish after firing. Yes, it is a single layer of glass with the butterflies fused to the underside. 

 This is the mold and the Papyrus Paper™ after the firing. Everything is as usual. No glue residue or anything else and I’m really pleased with the crisp look of my butterflies. 


In this 3rd picture you can see the mold and the Papyros Paper™ after the firing. Everything is as usual. No glue residue or anything else and I’m really pleased with the crisp look of my butterflies. 


Use Papyros Paper to Create a Sign Holder!

Use Papyros Paper to Create a Sign Holder!

Papayros Paper™ is usually used as a release paper in kiln forming. But lately we have used it for many other purposes. One of them we already introduced a few blogs earlier. Keep the Luminescent Coating on the Top Layer!

Today I like to show you how to use Papyros Paper™ to make your own little sign holders for pictures, price tags, art descriptions and more. I use mine to add signage to my free standing sculptures or price tags. I hope those little stands might be handy for you as well. Have fun and if you like it, please share this post with your fusing friends.


Fundraiser – Friendship Pendant

Fundraiser – Friendship Pendant

A Friend is Helping a Friend

For a while now I have thought that this “Friendship Pendant” idea would be ideal for a fund raiser. So when I was asked by a friend, if I would like to donate a piece I thought I will donate not just a finished piece, but have people create something beautiful while they are helping a personal cause. This way a person can give twice. Once toward the cause and second to her/his friends and I’m sure there will be lots to talk about when the pendants are passed on.

The Event will be in Ft. Myers at the Volkswagen Dealer ship,


Tuesday August 8, 2017, from 11 AM to 2 PM. 

There will be food, silent auction, raffle and of course the Friendship Pendant!

Glass Event in Maryland!

Glass Event in Maryland!

Affordable and Fun – Check Out These New Classes

Because we wanted everyone to have the opportunity to attend, I am offering  a variety of short projects in small 2 to 3 hour sessions. This way you can choose to attend one, two or even all 6 classes. The class themes are:

  • Drape Glass with the KLB Drapy System
  • Reverse Fusing with Wissmach Luminescent Glass
  • Stretching Your Glass
  • Casting Glass
  • Multi Tasking Molds
  • Working with Textures

Each session is limited to 10 students. The class fee is $50 per session, but if you sign up for more than one session, we will reduce the cost to only $ 40 for each session + materials.


Mark Your Calendar

Fall Festival, September 8th and 9th from 9 am to 5 pm.

Classes are held on September 11th and 12th at various times.

Anything Stained Glass

5104 Pegasus Court, Frederick, MD 21704

1-800-462-1209 


See You Soon!

Painting with Glass Powders

Painting with Glass Powders

Painting with Glass Powders is a video that I added to our YouTube channel many years ago. It seems to be one of our most popular videos. I used to have the ratio of Glass Powder, Aloe and Water in our shopping cart with the products. But since we do not sell glass powder at the moment, I decided to publish it here in our blog. 

Start out with a mix of 1/3rd each. If you like it thinner you can  add some more water and if you like it thicker, add some more glass powder. Shake it well. This mixture will not harden in the bottles. 


And here is the image of the fired piece from the video. 

Summer Experiment – Kiln Forming Without Kiln Marks!

Summer Experiment – Kiln Forming Without Kiln Marks!

This summer is dedicated to glass experiments. Every year I think I have a lot of time in the summer to experiment. But with all the traveling and teaching the summer is always over so quickly. So this year we took a break and are enjoying the time in our studio.

Here is a fun experiment I am so excited about that I want to share it with you. Inspired by Marcia Bernadette’s eBook and a technique Toni Glander explained in an article many years ago, I wanted to stretch a piece of glass without any mold or shelf marks. Marcia said in her book that she wanted to achieve a blown glass look in kiln formed glass. That brought back Tony’s idea of suspending the glass with fused in wires.

Since weeks I have done several experiments to stretch glass for thin glass shards, also known as confetti.  So when I started  this experiment I still had shards on my mind.

I also wanted to see if I could make opal glass look a bit more translucent by adding lots of clear. Since it was an experiment that I thought might end up in a big mess (like several others) I did not give the design a lot of consideration. Just wanted to use some nice Wissmach 96 colors that together would make a good color combination, stretch it thin and later use it as design elements in other pieces. But since I also wanted to dilute the opaque glass, I ended up with 3 layers and they won’t stretch thin in a 5” deep set up.

The long wires are fused into each corner and wrapped around the mandrel. The next thought was – “How could I secure the whole setup from collapsing onto the kiln floor?” The third mandrel was the solution and it won’t get stuck on the glass, I wrapped it with a few rounds of Papyros Paper.

Sorry, this is not a full “How To” article, since I have to do some more experimenting before I can publish a tutorial on this subject.

Bubbles – never again!

Bubbles – never again!

Yesterday, one of our new customers sent me this picture. Have you experienced this bubble problem? I did! Nearly 20 years ago, before I started using Kaiser Lee Board as a kiln shelf.

Here is my reasoning behind the bubble issue. Glass is a very slow heat conductor, while clay is a very good heat conductor. For example, you can hold a 3″ long glass stringer into a candle flame and it won’t get hot at the end of the stringer, even after softening in the front. With a clay piece, you would burn your fingers in no time. (If you want to try the clay part of this experiment, please have some Pepto Bismol next to you, to treat your burn marks).

When you place your glass on a clay shelf, there is always some air between the glass and the shelf and while the kiln heats up, the air gets hot and since it can’t escape will blow a bubble into the soft glass. Kaiser Lee Board, on the other hand, does not conduct heat any faster than your glass. In addition, it is also porous and any trapped air can escape easily. Another advantage of fusing with Kaiser Lee Board is that you can fire a lot faster than with clay type kiln furniture.  Oh yes, I have read about all the tricks and hoops you have to go through to avoid those bubbles and Kaiser Lee Board.

Image result for smiley graphics

Kaiser Lee Board is Ideal for the Paragon QuickFire 6

Kaiser Lee Board is Ideal for the Paragon QuickFire 6

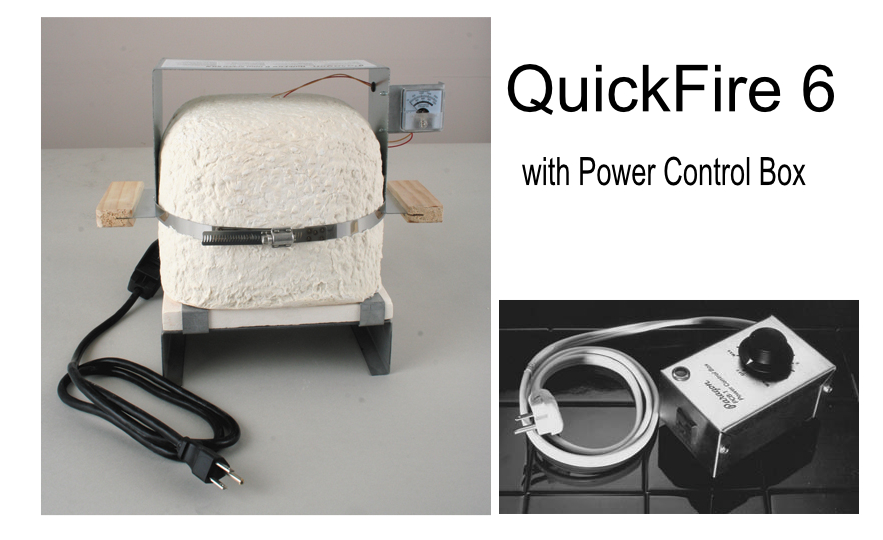
For those of you who do not know about the Paragon QuickFire 6 – here is a picture of it.

And yes it will fire quick and the trickiest part is to stay with it and check your glass often and turn it off, as soon as you like what you see. Kaiser Lee Board does not mind to be fired fast and does not absorb heat any faster than your glass. Therefor it is the ideal combination – both as a shelf and also as a mold material.

Just in case you get distracted it is best to use a QuickFire with a Power Control Box. It will prevent it from over firing, as long as you don’t leave your kiln alone on the highest setting.

Inspired by her request, we added two new options for Kaiser Lee Board.  Yes, you can now order the board in the smaller size of 6″ x 6″ in a pack of 2 or you can buy the Quick Fire Kit as shown on the right.

Yesterday one of my readers sent me a question.

“I use a Paragon QuikFire 6 kiln with ceramic-type kiln shelf.  Recently, I’ve developed a problem with a smooth area and wrinkles radiating out in the center of the back of the pieces. Could this be a hot spot on my shelf? I do keep it elevated with 1/4″ thick, 1″ long pieces of fiber board, but this no longer helps. There are now dark circular spots on the kiln shelf. After rereading my old copy of your book, I’m wondering if I should switch to Kaiser-Lee fiber board instead of ceramic kiln shelf to better distribute the heat; if so, what thickness fiber board should I use?”

Keep the Luminescent Coating on the Top Layer!

Keep the Luminescent Coating on the Top Layer!

Lately I’m experimenting with Papyros Paper and have made several discoveries. Today I want to share my latest with you. Laura P. once mentioned that she places Papyros Paper on top of a luminescent glass, when she slumps it, after she fused the luminescent side down in the first firing.

With the Kaiser Lee Board molds we generally full fuse and slump in one firing. Until now, I told everyone, that they have to use a reverse fusing mold, if they wanted to keep the luminescent glass on top. The piece that you see in the picture is actually on a reverse fusing mold and I added a yellow luminescent square on the back to stabilize the foot of the dish. This way I had nothing to lose if the piece did not turn out the way I wanted it. (Yes, I hate to waste glass). I covered the yellow square with a piece of Papyros Paper that was slightly larger than the yellow square. 

I fired it all the way up to 1420°F  (770°C) and hold for 10 minutes. It amazes me, that the Papyros Paper did not leave any grayish residue or marks on the glass, not even on the black. And yes, the luminescent did not fire off. 

Let me know what you think in the comment section below. And to be the first to hear about all the other fun things that will come up in the near future, please subscribe to this blog. 

Reverse Kaiser Lee Board Mold
New Session of 3 weekly Glass Fusing Classes at BIG ARTS on Sanibel

New Session of 3 weekly Glass Fusing Classes at BIG ARTS on Sanibel

Last Session of 3 weekly classes for this season. 

Many of our winter residents are moving back North (and leave us here to sweat). So now we have a small group of people who will attend the last 3 sessions. There won’t be a class in the second week of May. So if you happen to be in the area, give BIG ARTS a call 239.395.0900 to sign up and enjoy a the extra attention I will be able to give to you.

Laser Printed Decals For Design Pattern

Laser Printed Decals For Design Pattern

A different way to use your Laser-Printed Decals!

The last few weeks I experimented a bit with Decals! And with the technique I will show you below, you can use any laser printer on our decal paper.  

 
Are you trying to add a realistic element to your glass work but are not really good in free hand drawing? Here is what you can do. With transparent glass you can place any printed design under your glass and follow the lines with some high fire enamel paint. 

I’m using Multi Pens – they fire glossy even at around 1400 degrees and are easy to apply. But what can you do when you want to transfer a design onto an opaque glass?

To use this technique, you can actually print your design on the laser decal paper with any laser printer, since you do not want to retain the actual print. 

Directions

  • Print your design on a sheet of Laser Decal Paper
  • Soak the decal for a few seconds in clean water
  • Transfer the decal to your glass – carefully – do not rip the fine transparent film. I used a single layer of Wissmach Prisma glass, in the size of 10″ x 8″.
  • Shake the paint in your multi pen. Our multi pens come with fine metal tips. But I found an even better bottle at a craft shop and am now transferring the enamel paint from the big bottle to the little one. If the paint is too thick, you can add a few drops of water.
  • Shake well and start applying the paint. Keep the tip on the design while following the lines.  
  • When you are done put a pin in the metal tip to keep it free of paint. If you forget, the paint gets really hard and you might not be able to clean it out again.
  • Place your glass on a Kaiser Lee Board Mold and fuse and shape it in one firing.

Want to give it a try?

Feeling Creative

Are you Familiar with my Books?

Are you Familiar with my Books?

Have you had a chance to learn with my books? If so, please leave a comment at the bottom of this post. If not have a look at the videos below and see if you want to give them a try.

Thank you and Happy Fusing


Free Standing Clock

Free Standing Clock

This beautiful clock was created by my friend Jane Saghir. She used the on edge design technique to fuse this unusual shape and then we used some pieces of Kaiser Lee Board to bend the shape to create the free standing clock.

Yes, you can bend over Kaiser Lee Board without any expansion and contraction problems, as long as you make sure to use two pieces of board side by side.

A Different Way of Drape!

A Different Way of Drape!

Draped Double Glass Vase by M. P.
Tall Kaiser Lee Board Triangles Set Up

Tall Drape Set

This tall drape set up was inspired by one of our students, Marshall Paisner. Yes, Kaiser Lee Board is sturdy enough to support molds like this. As with our other “Drape Tringles” you can use them in a variety of ways.

All you need is a kiln high enough to support them. My kiln is about 14″ high.

For more ideas check out our Drape Kit. You can purchase it in our Square Store.  (on some devises it will take some time to pop up.


TGK Germany – Glasmesse – Glass Fair May 12th and 13th, 2017

TGK Germany – Glasmesse – Glass Fair May 12th and 13th, 2017

Have you ever been to the TGK Glass Fair in Germany. We will be there for the first time in May this year.

Yes, Wissmach Glass is sold in Germany and we will teach 3 short 2 hour classes, 2 on Friday and 1 on Saturday.

Petra Kaiser, Wissmach,Saturday 13.05. 09:30-10:30

 ” Wissmach 96 Luminescent and Wissmach Reactive  “

Wissmach 96 Luminescent offers the user new design possibilities, but comes with its own set of rules. The special luminescent coating gives the work a very noble shine. In this workshop, you will create a relief in conjunction with fiber paper and learn how to get the best results with Wissmach Luminescent glass. You will also get an introduction to the Wissmach reactive glass options. The work will be fired after the open house and will be shipped with your next order.

Looking forward to meet some European Glass Enthusiasts in Germany.